Pages

Sunday, December 6, 2009

Do-IT-Yourself DIY Holiday Gift Bag Using Recyclable Material

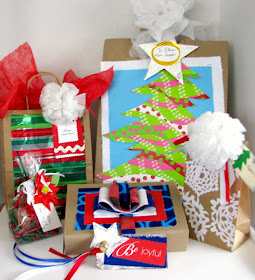
Handcrafted Customized Gift Bags
Using Recyclable Shopping Bags


Step 1: Use any Shopping Bag with Handle that you have around your house.
Using your Holiday Gift Wrapping Paper, cut 2 pieces
whatever dimensions to cover both Back and Front of the Bag.
You can draw out the cutting marks on the Junk side of the gift wrap and then cut.
Or You can even Free Hand cut the pieces.
You Don't have to be precise.
It's all up to you.


Step 2: Apply Glue or Double stick Tape to the backs of both cut wrapping paper.
I like to use my handy Glue Stick (versus liquid type glue like Elmer's) because it's Easy, Dry, and Sticks well.
Double Stick tape works well too...it won't come off that's for sure.


Step 3: Adhere your glued or taped wrapping paper to Both sides of the Bag.


Step 4: Ta Dah! You are done! Wasn't that Fast and Easy?
You can custom create bags to work with your holiday theme and
create matching or coordinating Gift Tags or cards.
Place your Gift inside the bag,
add a bunch of Tissue Paper at the top,
tie on a Snowball (see previous article on how to make these),
and your Gift Tag.
Voila, you are done!
Yayyyy!


A Quick, Easy, Customized Gift Bag
Easy on your Wallet, Great for the Earth, and best of all
Handcrafted by You!


There's no need to spend $5 on a Fancy Gift Bag. You can create your own. It's fast and fun to do. You can make one in less than 5 minutes.

This would be the Perfect Holiday Craft project to do with your children on Furlough Fridays. You can even adhere a Photo of your children or your Family Photo Card to the Front in the Center of the Wrapping Paper.

Be creative and add more embellishments like Garland to the top of the bag (glue gun...be careful it's hot...it's better if you do this instead of your kids), glue gun a silk flower Poinsettia or two, tie on some Christmas Jingle Bells...whatever you want to do. It's all up to your imagination.

Your Giftee will be pleasantly surprised when she/he receives their Holiday gift in a handcrafted bag made by you and your children.

If you blog about your creations or post it on the web, please send me a link so we can all see your creative handiwork. Have Fun!

Stay tuned and Check back because I'll be posting more DIY Do-It-Yourself Gift Wrapping Ideas all the way to Christmas.

Monday, November 30, 2009

Do It Yourself Pictorial... Snowball Pom Poms From Recyclable Plastic Grocery Bags

DIY Do-It-Yourself Snowball Pom Pom Pictorial
*
Make Pretty Things out of those White Plastic Grocery Bags


Step 1: Get a Plastic Grocery Bag in color of your choice.
I'm going to use White.


Step 2: Cut off both handles.


Step 3: Then cut up the rest of the bag into strips of 1 inch to 3 inches wide.
Don't be perfect. Just start cutting it up nilly willy. That's what makes this fun and fast.
You decide if you just want the White part of the bag or you want
color in your strips.


Step 4: You'll have a Lot of strips to play with.
More than this when you're done.


Step 5: Gather all your Long Strips. Cut them to the Same Long Length.
The Length is Up To You.
This will make it easier to shape your Pom Pom at the end.


Step 6: Fold them in Half.


Step 7: Cut Them In Half.
You'll have a LOT of smaller strips now.


Step 8: Using Dental Floss, String, Ribbon, what have you... 12 inches or longer,
Hold all the strips, and Tie in the Center of all the Strips.


Step 9: Hold down the Front of the Pom Pom.


Step 10: Trim to One Length.
You can cut it Short or Long...it's up to you.
Just cut it One length.


Step 11: Fluff out your Pom Pom...You're Done! Voila!
Wasn't that Fast and Fun?


Step 12: Attach your Snowball Pom Pom to a Gift tag, a Gift Bag,
on top of a wrapped Box...there's a lot of possibilities.

Once you start, you can't seem to stop.


Different Ideas for Holiday Gift Wrapping
Use things around your house
Create them Yourself

Hi and Thank you for stopping by. If you read about my blog through the Honolulu Star Bulletin, I'm so glad you decided to check out my blog for more holiday gift wrapping tips. Here I've included a very easy picture tutorial (or pictorial) on the super cute, easy, and inexpensive Snowball Pom Poms.

This is a Super Fun, Fast, and Simple project. It came to me as I was staring at my growing pile of plastic grocery bags and wondering what the heck to do with them. Then bing!... Make Pom Poms! I've created the above Step by Step Pictorial to guide you along. And trust me, when you start making them, it'll go Super Super Super fast. I couldn't stop once I got started because it was... Fun. A great holiday project to do with your kids also.

Stay tuned because I will be Blogging about More tips on other Holiday Gift Wrapping ideas in the coming days so please sign up to be on my email list (see column to Left for sign-up). Once you signed up, it will automatically send you an email when I blogged again. Then, from the email, you just click on my Blog and it will take you directly there if you want to leave a comment or see more on my blog page. If you make any of these creations, please send me a photo as I would be tickled to see it. Feel free to leave comments or ask me Questions in my Blog and I will answer as soon as I can.

Hope this helps you with decorating your Holiday gifts this year. The possibilities are endless with recyclable materials around your house.

Link to the Honolulu Star Bulletin article, Sunday Edition .... Click HERE
There's instructions on How-To make the Snowflake Goodie Bag seen in photo above. It's an easy project to put your homemade baked goods, a small gift, or other treats in with vintage style. Check it out!
**************************************♥♥♥♥♥♥♥********************************************
For Online Shoppers...

More Holiday Gift Giving Ideas--- Looking for that perfect gift for someone special on your Holiday Gift List? Then, please stop by my 3 online Etsy shops for terrific Artisan Jewelry, Gift Tags, Hair Accessories, and much much more. No hassle shopping right at your fingertips where you can safely and securely purchase your gifts in the comfort of your own home.

Here are my 3 online Etsy shops, please check them out!

1) Stacy's Designs 88 (stacysdesigns88.etsy.com) ... click HERE to Get there
*for Artisan Gemstone and Bridal Jewelry

2) Blue Lovebirds (bluelovebirds.etsy.com) ... click HERE to Get there
*specializing in Jewelry for Brides, Proms, and other Special Occasions

and

3) Lilikoi Cottage (lilikoicottage.etsy.com) ... click HERE to Get there
*specializing in Vintage Jewelry and Accessories, for that Cottage Shabby Chic look, and Vintage housewares

Please stop by and say "Hi!".

Happy Shopping and Mele Kalikimaka,

Stacy ♥♥

Holiday Jewelry in my Stacy's Designs 88 etsy shop

The Nutcracker Charm Necklace
Click HERE
SOLD!


Christmas Glass Blow Ornament Necklace
Click HERE


Snowflakes and Icicles Charm Necklace
Click HERE


Oh Christmas Tree Necklace and Earrings
Click HERE
SOLD!


To show your Holiday Spirits, wear a festive Christmasy necklace. I have several in my Etsy shop...Stacy's Designs 88.

Right now, I have a Free Shipping Offer going on now in my shop. Please check it out. This would be a great time to purchase gifts for those on your Christmas list.

Sunday, November 15, 2009

Tutorial...Christmas Vintage Violet Perfume French Bottle Tags

Vintage Violet Perfume French Bottle
Christmas Tag Tutorial


Step 1: Using Shipping Tags purchased from office supply store, Stamp on designs using Black ink.
Here I used my French Violet Stamp and my Christmas Sentiment Stamp.
Use whatever stamps you desire.


Step 2: Using my Close To My Heart "Bonding Memories Chisel Tip Glue",
I applied glue to areas I want to add some "bling" of fine Glitter.
Here I used some Lime Green Fine Glitter.


Step 3: Next, I applied Glue and then sprinkled on
some Purple Fine Glitter to the Violet flowers.


Step 4: Next, I applied my E600 glue to my tag and
then adhered my Swarovski Flat Crystal.
I used my new Gadget, "Quick Stik" to pick up my crystal and place on the glue.
It's a pretty neat tool. It has a bit of sticky stuff at the end which is just enough
to pick up something and weak enough to release on the spot.


Step 5: apply Blue ink to areas on card using ink pad
Step 6: apply Silver ink to areas using ink pad
Step 7: apply Black ink to side of card using ink pad


Step 8: using glue gun, apply drop of glue and adhere Vintage Paper flower
Step 9: attach Ribbon to the tag

I added some fine Aqua Glitter to the tag for some extra Va Va Va Voom!
I'll be selling these at the Xmas Craft Fairs
on December 4th and December 6th in the Kaimuki area.

Hope you enjoy creating some cute Christmas tags. These are so much fun to create. If you do create some tags, please email me your link. Thanks! Happy Holidays. They're also available in my Lilikoi Cottage etsy shop. Get your own HERE.

Sunday, November 8, 2009

November Baby, Here's your Birthstone Jewelry! Citrine Gemstone and Yellow Topaz Swarovski Crystal Jewelry New in My Stacy's Designs 88 Etsy shop

November Baby and Scorpion Hot Mama
Just Sold $75
Check it out HERE
On Back order to be restocked soon...


Thru Edwards' Eyes Swarovski Crystal Necklace
Click HERE


Bollywood Chandeliers
Click HERE to see them


November Citrine Necklace
Click HERE to see them


Autumn Leaves Swarovski Crystal Necklace
Click HERE


The Sun Always Shines Citrine and Pineapple Quartz Dangle Earrings
**Currently seen in Etsy Storque (click to check it out)**
Click HERE to see them


November Citrine Pendant Necklace
Click HERE


Have Luck, Will Travel Charm Necklace
Click HERE


Charms of Timbuktu Necklace
Click HERE


November Citrine Pendant Necklace
Click HERE


Luxe Citrine and Quartz Extra Large Hoop Earrings
Click HERE to get them


Thru Edwards' Eyes Swarovski Crystal Earrings
Click HERE


Topaz Swarovski Baroque Necklace
**Currently Featured on Nomad Crafts Blog...Click HERE to see Blog Feature**
Click HERE to see in my Shop


This Season, the Citrine yellow Gemstone is all the rage as the November baby birthstone. I have several necklaces and earrings for you to choose from in my shops. Please stop by two Etsy shops...Stacy's Designs 88 and my Blue Lovebirds shops to pick up your birthstone jewelry.

All handmade with Love by me in Hawaii.


Wednesday, November 4, 2009

New Vintage Fabric Rosette Headbands and Hairpins in My Lilikoi Cottage Shop on Etsy

My New Vintage Lemon Drops Hairband
Click Here


My New Vintage Orange Creamsicle Hairband
Click Here


My New Vintage Undeniable Hairband
Click Here


My New Vintage Innocence Hairband
Click Here


My New Vintage Sage Dreams Hair pins
Click Here


My New Vintage Green Grass Hair Pins
Click Here

Recently, I was at a local Xmas Craft and Bazaar at our Japanese Cultural Center. It's called Trash And Treasure and it's put on by Temari. They had real terrific vintage items for sale. I came across a box full of vintage fabric swatches. I filled a bag with all the fabric swatches and wondered what I was going to do with all of this fabric. I have this "thing" for vintage fabric. I'm not really into sewing but something just draws me to the fabric...it's designs, colors, and feel.

When I got home and stared at this bag of vintage wonderfulness, it dawned on me that I could make more vintage fabric rosettes. The idea to turn them into headbands and hairpins popped into my head. Bing! And then I got to creating. I have so many different swatches to choose from and they're all so cute and vintagey! I'm in vintage heaven.

Visit my Etsy shop Lilikoi Cottage to pick up your headband and hairpin set. These are so pretty to wear and will change your most simplest outfit into something fab!